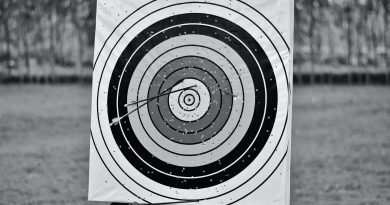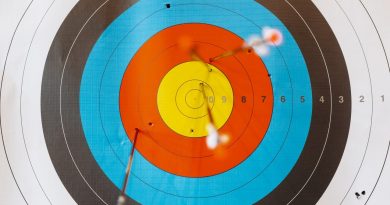
Aiming on the Target Range
The archer has a choice of methods of aiming, or sighting. They may be loosely classified into three groups: direct, indirect or point of aim, and the hunting aim.
The direct, or bow sight method of aiming has in recent years become increasingly popular on the target range and has gradually supplanted the indirect, or point of aim method of aiming.
The hunting aim, generally employed in combination with the high anchor, is favored by field shooters. This method of aiming, erroneously referred to as the instinctive method, is comparable with the wing shot’s method of pointing a shot gun when gunning for grouse or other fast flying birds. Neither shooter depends on mechanical sights of any kind. Both keep their eyes fixed on the target, fit the weapon, be it a bow or a shot gun, to the position indicated by this line of vision, and discharge the weapon. Just as a good grouse shot cannot write out a step by step diagram on how to hit a grouse, neither is there a short course of instruction which will enable the archer to master the hunting aim. The grouse hunter acquires proficiency only through constant and repeated efforts to kill grouse. Note: The expert still misses lots of them. The archer will acquire the ability to judge unknown distances and to deliver an arrow to the mark only through continued practice. Once an archer has acquired this ability, he can draw and release an arrow quicker than by any other method. This is a distinct advantage when game is flushed from hiding by the hunter.
Using the high anchor, the hand is raised along the side of the face, and the head is tilted a bit to the right, to bring the right eye directly over the arrow. The arrow shaft is then lined up with the target. The top of the bow is also canted slightly to the right. Keep both eyes open and focused on the center of the target while shooting. As you draw, indirect vision will permit keeping the arrow in proper alignment. A subsequent chapter will deal fully with this method.
The Bow Sight
The scores of target archers have shown consistent improvement since a sight has been adapted to use on the bow. Similar, in principle, to an adjustable rear sight on a rifle, the bow sight can be adjusted for elevation and windage, or horizontal deflection. The sight is affixed to the back of the upper limb of the bow, just above the grip,
The arrow, upon release, must whip around the side of the bow, except in the center shot type of bow perfected by Dr. Clarence N. Hickman, where the arrow is shot from a point near the center of the bow. Since the string, upon release, returns in a plane passing through the longitudinal center of the bow, and the arrow passes along the side nearest to the shooter, it would seem that all arrows should travel far to the left of the line of sight. A camera, designed to take pictures at the rate of 6000 frames to the second, was used by Dr. Hickman to record the flight of an arrow past the bow. These pictures show that the arrow bends around the bow on its flight, so that only a small amount of horizontal correction is necessary in the bow sight to align the flight of the arrow on the target. The quality of stiffness and resiliency in an arrow is called the spine. This quality should vary with the drawing weight of the bow. A badly matched arrow can have too much or too little spine. In the first instance, the arrow will not bend around the bow, and will oscillate badly in flight. It will also veer to the left of the target, or more properly said, the line of sight. Too little spine will result in permanently warping the arrow, or causing it to buckle and break under the initial thrust of the bow string. The novice can easily construct a simple bow sight from materials available in the home. Cut a strip of light felt, about seven inches long and one-half inch wide, from the brim or an old hat, or secure a flat slab of cork of the same dimensions and about one-eighth of an inch in thickness. Glue the material to the back of the bow, just above the grip. An ordinary pin may now be inserted in the felt or cork, with the head of the pin projecting beyond the side of the bow on the same side as the arrow plate,
Manufactured bow sights range in price from $1.25 for the simpler type, to $6.00 for a bow sight designed for one of the well-known makes of metal bows. Regardless of the type of bow sight, it is wise to disregard any provisions the manufacturer has made to attach the sight to the bow with screws. A screw, inserted in a wooden or metal bow, creates a weak point. Disregard the screws and bind the sight to the bow with scotch tape. Adhesive tape will also serve well for this purpose. Attaching the sight in this manner, avoids the danger of damaging the fibres of the wooden bow, or creating a plane of weakness in the cross section of the wood or metal bow.
There is one disadvantage in the use of the bow sight, as compared to the point of aim method of sighting. The archer does not see the point of the arrow at full draw as he does in the point of aim method of sighting, and consequently, he may not bring the arrow tip back until it is in line with the back of the bow. To avoid this possibility, some archers use the forefinger of the left hand to determine, by feel, the position of the point of the arrow, and to make certain that it is drawn even with the back of the bow.
The distance at which an archer may make use of a bow sight in aiming, is limited by a combination of the drawing weight and the cast of the bow. At a fixed distance, the lighter the drawing weight of the bow, the closer the sight will approach the position of the arrow plate. At this point, the sight is in a position where it will interfere with the flight of the arrow if it is lowered any farther on the bow limb. To shoot a greater distance with this same bow, the archer avails himself of a prism sight. The prismatic principle permits the archer to elevate the bow so that the arrow will carry the increased distance. The sight is fixed at a higher place on the upper bow limb where it will not interfere with the arrow. The prism is equipped with cross hairs, and the image of the target is seen through the prism.
Adjusting a bow sight for elevation, after the initial setting has been found by trial and error, can be done accurately by making use of a simple geometric principle,
Using a Point of Aim
The under jaw anchor is generally used by the champion target archers, and is conceded to be the most accurate shooting position. In this position, the eye of the archer is at a higher elevation than the nock of the arrow, and the archer cannot sight along the shaft of the arrow as a gunner sights along the barrel of a shotgun. The archer, using a point of aim, sights over the point of the arrow, and an angle is formed between this line of sight and the trajectory that the arrow follows as it flies toward the target.
When the aiming point is correctly located for elevation, it may be necessary to make a correction for deflection if the arrows strike the target to the right or left of the center. This correction is made by a change of position of the archer on the shooting line. If the archer shifts his position along the shooting line, the arrow will move in the opposite direction across the face of the target. The point at which the arrow strikes the target, will move across the face of the target a distance which is directly proportional to, but not necessarily equal to, the distance that the archer shifts his position along the shooting line. There is one point when these two distances will be equal; that occurs when the point of aim is located one half the distance from the archer to the target. If it becomes necessary, a horizontal correction can also be accomplished by shifting the aiming point to the right or left, at the same time keeping a fixed position on the shooting line. This latter method is slow and inconvenient, as the archer is required to walk out on the shooting field and shift the aiming point in order to make the correction. At the longer distances, the point of aim may be on or above the target. Once the point of aim has been established, the archer places a foot marker on the ground at the point of each toe, so that he can assume the same position each time he comes to the shooting line. Foot markers should always be constructed, so that they may be inserted flush with the ground. If they project above the ground they are liable to be knocked out of position by other archers, and may prevent another archer from standing in his accustomed position on the shooting line. A good foot marker resembles a large metal thumb tack with a disc about the size of a quarter of a dollar. If you wish to personalize your equipment you can stamp your initials on the face of the metal discs.
Recording the Point of Aim
Once an aiming point has been established for a fixed distance, the archer can use a range finder to record this distance for future use. Properly used, a range finder relieves the shooter from setting a point of aim by trial and error. A range finder,
Now if the button is held in position against the inside of the front teeth, and the string extended to its full length, the stick will always be at the same distance from the eye. To steady the extended left arm, you may rest it on the bow held upright by the remaining fingers of the left hand. Sight over the top of your stick and bring the stick to a position where the center of the target appears to be resting on the top of the stick. Keep the range finder in this position and sight to your point of aim along the side of the stick. Move the thumb nail of your left hand up the stick until the nail intersects this line of sight. Mark this point on the range finder by a pencil line, and indicate the yardage. To reestablish the point of aim the next time you wish to shoot at the same distance, you need only to sight over the range finder at the center of the target as previously explained, then use the pencil mark as a sight to determine the location on the ground where the point of aim should be placed. Keep this point, on the ground, fixed in your vision and walk forward and place your aiming point at the spot. If you determined this location from a position on the shooting line directly over the shooting peg, then your aiming point will also be located on the line extending from the shooting peg to the center of the target.
To be satisfactory, a point of aim marker should fulfill two conditions: it should be small so that the archer will consciously center the tip of the arrow each time he aims, and the marker should have high visibility in order that it appear distinct to the archer. A bright metal ball slightly larger than a golf ball, and affixed to a pointed rod about six inches in length makes an excellent aiming point. The rod can be forced into the turf to hold the marker in place. A metal ball has the advantage over a flat disc in that it reflects the rays of the sun from any angle and, therefore is highly visible, whereas the surface of a flat disc may be in shadow at an inopportune time.
The point of aim method of shooting has been described at length because it permits the use of a light bow to shoot distances which would be prohibitive, if the archer depended on a bow sight. Persons whose limited physical capacity does not permit them to shoot a sight equipped bow of sufficient drawing weight to give a sight on the target at the longer distances are able to turn in credible scores on the target range using an aiming point. In fact the choice of the bow sight over the aiming point has occurred in recent years. It is not unusual to have a point of aim shooter win a target tournament in the older target clubs. The point of aim is still frequently the choice among the women shooters at the longer distances.