Archery Target Shooting Technique
Preparation
A basic rule which the beginner should keep before him at all times, is that archery is not a test of strength, but a game of skill, and to enjoy snooting a bow, skill must be acquired. As with any other sport, good form is gained through practicing the correct procedure at all times. Scores will not improve just by shooting. Technique is most important, and it is gained through observing the performance of skilled archers on the shooting line, seeking personal advice and instruction from them on correct shooting form, which archers are glad to give, studying closely such printed instructions as you are able to obtain, and deliberate and persistent attempts to put this information into practice.
It is unfortunate that there are only a few qualified instructors in our schools and Scout troops. Equipment is frequently available and enthusiasm is always evident. However, interest in the sport lags when skill is not acquired just by shooting. Archery is not a spectator sport. The satisfaction comes from the skill each individual develops in hitting the target.
In the previous chapter, the beginner was advised on suitable equipment which he should acquire to prevent undue strain and fatigue on the practice range. The next logical step is to assemble the equipment and prepare a practice range so that we can develop a correct shooting form. A bow used correctly is an accurate weapon and its effectiveness, like a rifle, is limited only by the skill of the individual shooter.
A few words of caution before you begin a practice session. At full draw the bow is under such tension or strain that it can be described as approximately at its breaking point. If overdrawn, the least that will happen to the bow is that the fibres will be strained and the bow weakened. Inevitably, overdrawing will result in a broken bow.
Two items of equipment are indispensable to the archer for his protection. An arm guard is worn on the inside of the bow arm and protects the forearm from being injured by the bow string when the bow is held in the proper position and the string released. Each time an arrow is released the bow string will slap the forearm just above the wrist with painful consequences to the archer unless the arm is protected by a guard. The first three fingers of the drawing hand are protected by a leather shooting tab or a shooting glove. Without this protection blisters will quickly form on the first joints of these fingers. Tincture of Benzoin applied to the finger tips will help toughen the skin. It should be applied before the finger tips have become sore. A good grade of talcum powder should be carried in the archer’s kit. Use it to dust the shooting tab or the fingers of the shooting glove. It reduces friction between the leather and the bow string and helps to provide a smooth release.
An archer dresses for comfort within certain limits. Shoes should be comfortable and sturdy, as approximately a mile is walked by the archer in shooting one American Round. The walking is done at a leisurely pace between ends and is interspersed with conversation on the relative merits of bows, arrows, and tackle in general. The beginner will do well to listen closely to this small-talk, as the opinions expressed differ widely. Nevertheless, archers have done a lot of experimentation and there is a lot of merit in their ideas. Many of them can be adopted to advantage by the shooter.
When an arrow is released from the bow, the string passes very close to the chest and shoulder of the archer. Sport shirts with open collars and loose half-length sleeves are not suitable apparel for the target archer. Ties also interfere with the free movement of the bow string. A vagrant breeze will blow a collar tip, a loose sleeve, or a tie into the line of movement of the bow string and deflect the arrow from the line of flight to the target. For summer wear, both target and field archers have adopted the Tee shirt with short tight fitting sleeves. Growing opposition is heard in various quarters to the recent practice of men appearing on the shooting line stripped to the waist, and to the shorts worn by the ladies. Neither practice is considered necessary and, that the lack of attire is becoming to the individual is a debatable question. In cool weather a long sleeved V neck sweater is worn. Loose fitting upper garments, so necessary to keep one warm in cold weather, become a problem for the bow hunter.
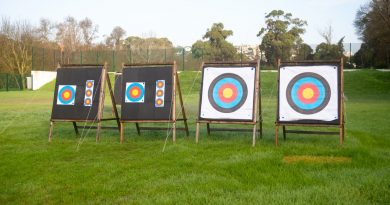
We will assume that the beginner does not have club facilities available where he or she can practice when no tournaments are in progress. Therefore, the target should be placed in an area where the grass can be kept short, especially for a distance of at least fifty feet behind the target and the area immediately in front of it. An arrow which misses the target is easily lost, as it will slide along the turf and be covered throughout its entire length even although the grass is short. A beginner would be wise to mark the spot where an arrow strikes the turf, and if shooting alone, proceed immediately to the spot and retrieve the arrow. Time will be saved in the hunt for lost arrows, which is annoying and time wasting, if this procedure is followed. To withdraw an arrow, which is buried the greater part of its length in the turf, without damage to the fletching, proceed as follows: Locate the point of the arrow and grasp it with the thumb and forefinger. Draw the arrow forward in a continuation of its line of flight without bending the shaft except to raise the tip from the turf as the arrow is slowly withdrawn. Withdrawing the arrow in this manner will not bend the shaft or damage the feathers.
With the target in position, step off about twenty paces and establish this point as the shooting line. Fix the ground quiver in the turf at this point and place six arrows in the metal ring provided for the purpose, with their points resting on the turf. A belt quiver, which consists of a cylindrical tube, made of leather and provided with a loop to attach the quiver to a belt may also be used to hold the arrows. An archer handles his or her arrows with extreme care so that they will not become deformed and will always fly true to the mark. Damaged or damp feathers, crooked shafts, and foreign material sticking to the arrow, will prevent accurate shooting. A wool tassel,
Ask the lady of the house for the remnants of wool yarn left over from her knitting and an empty thread spool of a size that held 200 yards of number 60 thread. In addition secure a piece of Venetian blind cord approximately 14 inches in length and you have the materials necessary to assemble the tassel. Form a loop by inserting the ends of the cord through the spool and knotting them securely. Cut the strands of yarn into 18 inch lengths, so that the finished tassel will be approximately nine inches long. Lay the middle points of the strands of yarn on top of the spool, and with an extra piece of yarn bind the yarn to the spool, and again bind tightly just below the spool. You now have a tassel that you can hang from your belt.
At this time it is well to attach the arm guard in place on the bow arm. If you forget you will get a sharp reminder when the first arrow is loosed from the bow.
A new bow is generally furnished with a double loop string. To string a flat bow, or brace it, as the archers say, place one loop of the string over the tip of the upper limb of the bow and let it slide down the limb. The upper limb of the bow can be identified by the arrow plate
Grasp the bow at the top of the grip with the left hand, and hold the bow in an upright position. Place the point of the lower limb of the bow against the instep of the left foot with the back of the bow toward you. Now lean the top of the bow slightly forward and to the right, advancing your right foot about one half a pace at the same time. Keep the left elbow close to the body, and holding the loop with the thumb and forefinger of your right hand encircling the tip of the bow, place the heel of the right hand against the back of the bow and exert pressure. At the same time, slide the right hand up the limb of the bow, until the loop of the bow string enters the bow nock. Guard against pinching a finger, by inadvertently getting it inside the loop. To unstring the bow, exert pressure in exactly the same manner, and with the thumb and forefinger of the right hand slip the loop of the bow string out of the upper bow nock and let it slide down the limb of the bow.
If you are a left handed person, substitute the left for right and vice versa in the text, as the bow may be shot from either hand with equal facility.
When the bow is braced, it must be checked to see that it is strung to the proper height. This is one of the musts in archery, if good scores are to be shot with regularity. The force, with which the arrow is propelled from the bow, will govern its trajectory or line of flight; and at full draw, this force should remain constant with each succeeding shot. Consequently, it will be evident that the initial tension placed in the bow, when it is braced, must remain constant to achieve this result at all times. The amount of tension in a braced bow will vary with the temperature and with use. When a bow is properly braced, or strung, the distance between the grip and the bow string should equal a fistmele.
To secure the exact height, the fistmele, when the bow is braced, and a double loop bow string is used, remove one loop of the string from the bow limb, and twist or untwist the bow string to effect a change in its length. By repeated trials and adjustment of the length of the bow string, the correct fistmele will be obtained. Make it a habit to check the fistmele at frequent intervals while shooting, particularly if your arrows begin to land low on the target. This is an indication that the bow string is weakening and will break shortly. A worn, or frayed bow string should be changed before it breaks. The chances of breaking a bow are increased if the bow string is permitted to break, and the bow limbs snap forward without any restraint. In extreme cases it may be that the fault lies within the bow, which may have begun to rupture. Check it carefully for any sign of failure. However, in most cases, the fault will lie with the string, which will increase in length, as a general rule, before it breaks. This increase in length can be detected by visual inspection. The bow string will have been discolored by use, and, as the string lengthens or stretches, there will be exposed to view strands which have been covered, and consequently are free from discoloration. They will be lighter in color, and easily detected. A single loop string is sometimes used. It has one advantage; it can be used on bows of different lengths. A timber hitch,
Always unstring your bow when you have finished shooting, and do not store the bow by standing it in a corner. Hang it from a wooden peg at the nocking point, or lay it on its side on a shelf. These precautions are necessary to prevent the bow limbs taking a permanent set and weakening the cast of the bow. Cast is the inherent ability of a bow to propel an arrow.
The keeper, a short piece of elastic cord, attached to the loop of the bow string and to the bow near the top nocking point is used to prevent the loop from sliding down the limb when the bow is unstrung. Experience has shown that this keeper should be removed from your bow if it comes equipped with one.
If a bow breaks, the keeper will cause the top limb of the bow to fly back and strike the archer. The risk of a painful injury is reduced when the keeper is removed.
Some bows come equipped with a built-in arrow rest, a
Good bow strings are served, or wrapped, to prevent wear at the point where the arrow is nocked on the string and the fingers come in contact with the string when drawing the bow. About four inches of the bow string are sufficient to serve for this purpose. Number eight linen thread may be used. To serve a bow string, wax a length of the thread with bees wax. Wrap the end of the thread under at the start and again at the finish. Draw tight, and cut off the surplus with a razor blade. To avoid any possibility of severing the bow string in this operation, be sure to cut away from and not toward the bow string.
A nocking point can be made on the bow string at the place where the arrow and bow string meet, at the same time that the bow string is being served. It is made by taking several turns of the serving string on each side of the place where the arrow nock fits on the bow string.
We are now ready to take our place on the shooting line and practice a dry run.
Form
Facing his first target, the beginner has reached a point where he or she unconsciously makes a decision, upon which will depend much of the future success and pleasure which derive from the sport of archery. Whether the ultimate objective is to loose a broadhead arrow at a deer, which has been successfully stalked, or to match skill in friendly competition with other archers on the target range, or over a field course set up to simulate actual conditions encountered in the hunt, or both; at this early stage of the game the road divides.
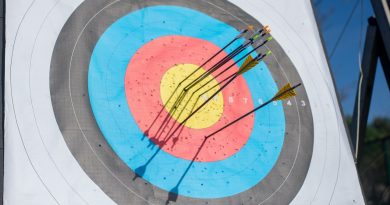
One fork is the easy road. It runs down hill, and it is smooth and easy to travel. If a beginner follows this road he just starts shooting. Some hits, plenty of misses, and at the start an occasional gold will fall to his lot. Gold is the target archers’ term for a bull’s-eye. Along this easy road travel the chaps who
Let us assume that enough has been said to impress upon the beginner one of the maxims of archery: It is the man behind the bow who scores the hits. Our aim as a novice requires that we take the right fork where the road divides. We will choose to master shooting techniques. We will strive constantly for form, precision, and sameness in every act of drawing the bow and loosing an arrow. As our technique improves, so will our scores. It is an uphill road, but it has no end, and near the top are the champions, still struggling to achieve the mythical goal of archery, a perfect round.
The technique of shooting a bow, or to use a phrase in common use among golfers, proper form, can be broken down for purposes of explanation and discussion into several component parts: stance, the draw, anchor, aim, holding, release, and follow through. Each part must be mastered separately and the several parts coordinated into a smooth working whole. Intelligent practice is the key to successful shooting and full enjoyment of the sport of archery.
Stance
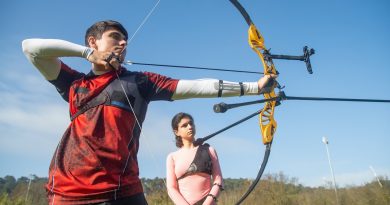
Take position on the shooting line with the left side facing the target. (Left handed persons substitute right for left and vice versa in all instructions). The feet should be spread comfortably apart, and the body weight distributed evenly on both feet. Both toes should touch an imaginary line drawn from the center of the target to the archer. Hold the bow in a horizontal position in the left hand, by the grip, with the bow string up, and passing between the left arm and the body. The arm is hanging at the side in a relaxed, natural position. Stand erect, with the head up and shoulders squared. Your gaze should be fixed on the horizon. In this position, the archer is facing at right angles, (90 degrees) from the target. Now turn the head, and look along the left shoulder at the center of the target. Keep the entire body fixed in this position, throughout the act of drawing the bow and releasing an arrow. Do not turn the body at the hips to face the target, and in drawing the bow do not shift the body weight from one foot to the other, during any part of the act of shooting. To relieve the strain of bringing a bow to full draw, it is quite natural for the beginner to permit his head to move forward to meet the bow string. Guard against this fault and keep the head fixed and immovable.
Nocking the Arrow
Raise the bow arm, and bring the bow to the horizontal in front of you about waist high. The arrow plate on the bow should be up, with the string resting against the inner forearm, and between the left hand and the body.
Holding the bow in this position, draw an arrow from your quiver, grasping it at the nock with the thumb and forefinger of the right hand,
Lay the arrow across the bow at the arrow plate, and revolve the shaft until the cock feather, which is at right angles to the nock,
Then, draw the arrow toward the string so that the bow string enters the arrow nock at the nocking point on the bow string. Continue to exert a slight pressure until the bow string is placed under tension by the thrust of the arrow. At this time, use the forefinger of the left hand to force the arrow shaft against the arrow plate. The right hand can now be released, and the arrow will remain in place, fully nocked.
Draining
The bow is drawn with the first three fingers of the right hand. The thumb is not used. It should be relaxed in the palm of the hand, with the end touching lightly the base of the little finger. This position is somewhat similar to the position of the thumb in rendering the Boy Scout salute. It is necessary to consider carefully the position of the thumb, so that the shooting hand will fit comfortably beneath the jaw of the archer at full draw.
With the palm of the right hand up, and the fingers fully extended, place the forefinger under the bow string to the right, or upper limb, side of the arrow nock. The middle and ring fingers are placed under the bow string to the left of the nock. The bow string should cut across the three fingers or the drawing hand, about three-quarters of the distance from the finger tips to the first joints. Draw the string back carefully to the right for a few inches, so that the fingers of the right hand take over the work, which has been performed by the forefinger of the left hand, in holding the arrow under tension against the bow string. The left forefinger should now be returned to its position where it assists in holding the bow in position or, serves as an arrow rest when the bow is not so equipped. All three fingers should work equally in drawing the bow.
Swing the bow to a vertical position, with the grip about shoulder high. The bow should rest in the hand against the base of the thumb, and at the apex of the triangle formed by the thumb and fingers of the left hand. Curl the fingers lightly around the bow. The bow is held in position principally by the tension of the draw. Do not grip the bow tightly with the left hand. Many archers shoot with the bow resting only in the V formed by the thumb and the extended fingers, closing the fingers of the left hand to prevent the bow from falling, after the arrow has been released. This method is not recommended for beginners.
Extend the left hand toward the target, with the arm bent slightly to permit the underpart of the left elbow to turn down and back. This provides proper clearance for the bow string, which would strike the inner arm at the elbow, if the arm is thrust out stiff and straight. You are committing this fault if the bow string, upon release, catches inside the upper part of the arm guard.
Now, with the drawing hand, pull back steadily, using the shoulder muscles to do the work. The forearm should be raised to a horizontal position, with the right elbow at shoulder height. The hand and forearm are only a connection between the shoulder muscles and the bow string. The fingers, hand and forearm should be relaxed and form a straight line. Properly held, the tips of the fingers, holding the bow string, bend only at the first joint.
At this stage, precautionary measures, which have nothing to do with the act of shooting, are taken by the archer in order to protect his equipment. The beginner has been warned that he should never overdraw a bow. To prevent this possibility, an arrow should always be nocked in position to measure the length of the draw. Flex the bow carefully by increments, increasing the length of the draw gradually, until the point of the arrow is drawn even with the back of the bow at the arrow plate. A wooden bow, if brought to full draw immediately after it is braced, may rupture. This is particularly true on cold days. During this flexing process, the beginner may find that the arrow moves away from the side of the bow and falls off the arrow rest, or it may rise vertically from the arrow rest as the bow is brought to full draw. In the first instance, this trouble is avoided by the way the drawing fingers apply the initial pressure to the bow string. Touch the bow string with the three drawing fingers at the first joints, and as you apply pressure in the act of drawing, let the string revolve until it reaches a point about midway between the first joints and the tips of the fingers. This position is the actual point where the bow string rests throughout the draw. Following this procedure will bunch the flesh of the first joints of the drawing fingers toward the tips. This aids in preventing the fingers slipping from the bow string during the draw. While the bow string is revolving, the friction between the string and the inside of the arrow nock, will force the arrow shaft against the side of the bow at the arrow plate, and will hold it firmly in this position throughout the draw. In the second instance, the point of the arrow rises vertically during the draw, because pressure is not being applied evenly, on both sides of the arrow, by the drawing fingers, and in a direct line with the arrow shaft.
The Anchor
The muzzle velocity of a rifle bullet is dependent on the powder charge, and remains constant for each shot, because the manufacturer has loaded each case with the same number of grains of a uniform grade of powder. The same result is sought by the archer for each arrow that he releases from the bow. It follows, that the archer must perfect a drawing technique, which will impart the same initial velocity to each arrow. In other words, the length of the draw must remain constant for each shot, in order that each successive arrow will follow the same trajectory, on its flight to the target.
There are several methods used to position and anchor the drawing hand at full draw. Generally speaking, anchoring can be divided loosely into two main divisions. First, the under jaw anchor, with which archers make the best scores in target shooting. This is the anchor generally preferred by archers who use a bow sight, or point of aim, as a shooting aid. Its use is not confined to target snooting, and many archers, using the underjaw anchor and a bow sight, compete in field events and hunt with the bow. In field archery, an archer, using a bow sight, is known as a free-style shooter. Second, is the high, or cheek anchor, used almost exclusively by the field archers in competition, and in the hunting field. Those who use the high anchor, shoot without the use of a bow sight, or any other mechanical aid, such as a point of aim. This method is erroneously called “instinctive” shooting, which may trap the unwary beginner, who may gain the impression that no practice is necessary to acquire proficiency in this method of shooting. Actually, judgment of elevation required to hit a target at an unknown distance, is only acquired by experience, and there is nothing instinctive about the method. With this preliminary discussion, we will confine our description of anchoring in this chapter to the underjaw anchor, which will give excellent results when used with a bow sight, or a point of aim, on the target range. The “high anchor” and hunting aim will be described in a later chapter. At this point it should be fully understood that excellent scores can be made on the target range using the high anchor, and without the use of a bow sight, nevertheless the underjaw anchor and bow sight have produced the high scores in late years, in target tournaments.
Keep the elbow of the drawing arm level with the shoulder. Draw the bow until the V formed by the forefinger and thumb can be fitted snugly under the jaw, with the forefinger bearing up against the underside of the jaw bone. The tip of the forefinger will come to rest approximately opposite the chin. In this position, if the head has been held steady, the bow string should touch the point of the nose and the middle of the chin. If you have chosen arrows of the proper length, the tip, or point of the arrow will be even with the back of the bow.
Holding and Releasing
The arrow is loosed by relaxing the tension in the first joints of the drawing fingers. This allows the bow string to slip smoothly from the fingers, and propel the arrow toward the target. When the tension is released the drawing hand should move directly to the rear, along the projection of the line of flight of the arrow. By reason of physical limitations, this movement cannot amount to more than a couple of inches. If the beginner does not exercise extreme care with the release, he will find that he is flipping the drawing hand away from the face at right angles to the line of flight, in a misguided effort to remove his fingers quickly from the bow string. In this case, the arrow will be thrown wide of the mark.
“Creeping,” is the term used to describe any forward movement of the arrow prior to the instant of release. The archer must guard constantly against creeping. The inclination to let the drawing hand move forward to relieve the strain, or to assist in releasing the bow string will result in creeping. Creeping develops a loss of initial velocity of varying amounts from shot to shot. The result is that the arrows will fall low on the target. Fatigue will cause an archer to ease up on the tension necessary to keep the bow at full draw, and in consequence the arrow will creep forward just prior, or during the release. It is imperative that each arrow be released, in the same manner, and from exactly the same position, in order to score consistently on the target.
Holding, in its simplest terms, is the ability to maintain a fixed position at full draw for the interval of time necessary to align the sight on the target.
Aiming
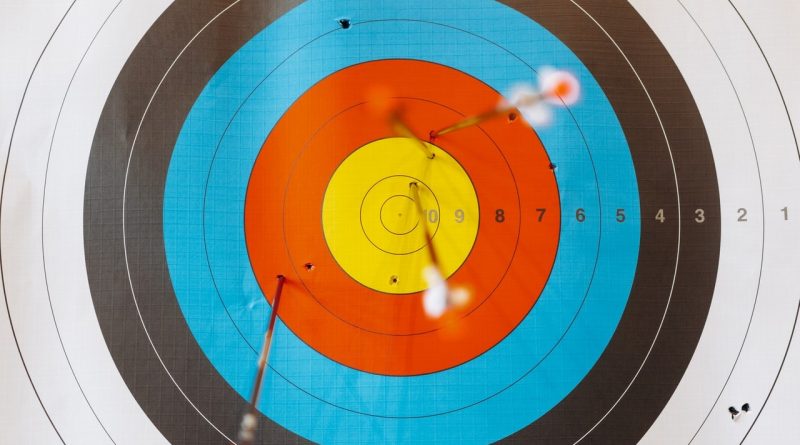
Subsequent chapters are devoted to the methods of aiming employed by target and field archers. Each group employs a different technique, and each method has its distinct advantages in a particular field. No one method of aiming can be considered superior to all others. Shoot with both eyes open. You need good eye sight to see your target under conditions of poor visibility. Your sighting, or governing eye will be your right eye, which is directly above the arrow shaft, and the line of vision will be directed along the shaft without any effort on your part to effect this result. In target shooting, with the bow held vertically, the line of vision will appear to pass between the bow string and the bow, just slightly to the right of the bow string. Projected in the same vertical plane the bow string and the bow will appear in the relative positions shown in
In the illustration, a simple type of bow sight, consisting of a strip of adhesive tape fixed to the belly of the bow, into which a pin has been inserted shows the line of sight to the target. For purposes of illustration, the sight is shown attached to the belly of the bow. In actual use, it is the practice to attach the sight to the back of the bow, so that the bow string will not interfere with adjusting the pin for elevation and deflection.
Follow Through
The effort to hold the bow at full draw is considerable, and it is natural for the archer to relax completely when the arrow is loosed. Self discipline is required, at this time, to insure that the stance and position are held until the arrow has broken all contact with the bow and is speeding on its way to the target. A common fault is to permit the bow arm to drop at the moment of release, and before the arrow has travelled the arrow rest. Unless the arrow has reached the point of free flight, any movement of the bow will influence the direction of the arrow’s flight.